














Showing posts with label DIY. Show all posts

Thursday, March 27, 2014

Yellow Chirping Chicks and Feathered Hen Egg Holders

*This post contains affiliate links. Please see my Disclosure Page for details.

Easter is only a month away so last week we decided to get a jump on our Easter crafting. We made two chicken crafts using egg carton. These were super simple and tons of fun.


Egg Carton Chirping Chicks
These little yellow chicks are so much fun to make and make a great candy holder!

Materials:
-Egg carton cups
-Yellow paint
-Orange and yellow construction paper or craft foam
-Feathers
-Wiggly eyes
-Glue
-Scissors
-Tape
-Paintbrush


What to do:
1. Cut two cups from an egg carton and trim them to smooth out the tops.
2. Paint the cups yellow and let them dry.
3. Tape the two cups together on the inside using a piece of tape. See photo above.
4. Cut a beak and feet out of the construction paper or craft foam and glue onto the chick.
5. Glue on wiggly eyes.
6. Glue on feathers for the wings.
7. Feed your chirping chick a tasty treat (jellybeans, etc). 


Egg Carton Hen Egg Holders
These little hens are so adorable, easy to make and can hold safely hold your decorated Easter eggs or plastic eggs.

Materials:
-Egg cartons
-Wiggle eyes
-Yellow and red craft foam
-Feathers
-Paint (white, brown)
-Glue
-Scissors
-Paintbrush
-Decorated Easter egg or plastic egg


What to do:
1. Cut the egg cartons, the edges of egg carton work best. Shape the body with scissors to round out rough edges. See photo above for cutting details. 
2. If you wish paint your hen white, brown etc. We opted to keep ours natural.
3. Cut a beak and waddle out of craft foam and glue them onto the hen.
4. Glue on the wiggle eyes.
5. For the wings, tail and crest glue feathers onto the sides and back of the hen.
6. Place a decorated Easter egg or plastic egg into your feathered hen egg holder!

What kind of fun Easter crafts have you been making?


Linking up with: #GetYourCraftOn, Ben and Me

Monday, January 13, 2014

Make It Monday - Valentine's Day Tissue-Paper Flowers

*This post contains affiliate links. Please see my Disclosure Page for details.


Hello and welcome to my new link up Make It Monday! If you or your children made something awesome recently link it up. It can be a Lego creation, a beautiful masterpiece, a creative craft or a delicious recipe...you get the point! If it is something you made and created with your own two hands you can link it up.

Today I have a super easy and inexpensive craft to share with you. These lovely tissue-paper flowers make a terrific Valentines bouquet, a pretty corsage, an adorable flower ring and even a tasty treat holder. I bought all of the supplies at Dollar Tree.


3 Simple Materials:
-Assorted colors of tissue paper
-Pipe cleaners
-Candy if you are making treat holders

3 Simple Instructions:
1) Cut 4 pieces of tissue-paper into squares. Size just depends on how big you want them to be. We made most of our large ones (with the exception of the ring) about 5-6 inches squared.
2) Put them in a pile and fold it like an accordion.
3) Tie the center with a pipe cleaner and then very gently pull each piece of paper apart into flower shape.


**If you want to make a tasty treat holder just glue a piece of candy or use a pipe cleaner to tie a piece of candy to the center of the flower. For the ring follow the instructions above but make the flower smaller flower and then make a ring out of the pipe cleaner to fit your finger. For some added fun you can even spritz the flowers with perfume to make them smell good!

If you have a creation to share
please link up at the bottom of this post!
Feel free to copy this button to share
somewhere on your blog.

Link up: Make It Monday with Kathy's Cluttered Mind.


Saturday, September 7, 2013

365 Days of Pinterest Link Up - Week 3 and 4 - Recipes, Science, Arts and Crafts and More

*This post contains affiliate links. Please see my Disclosure Page for details.


Welcome to 365 Days of Pinterest Week 3 and 4! I am teaming up with my great friend Almost Supermom for this fun challenge. 

The challenge is simple just choose a pin from one of your many boards and do it! Then blog about it and link up. You can choose to do a post every day like Almost Supermom is or you or you can do a weekly wrap up on Saturday/Sunday like I am! So what are you waiting for? Do something with those thousands of pins (we know you have that many) and join us over the next 365 days!!! 

Be sure to follow our Pinterest boards Almost Supermom and Kathys Cluttered Mind to see what sort of stuff we will be doing.

As you know we were very busy been moving into our new place last month so I had to take a few weeks off from from doing any Pinterest projects. I hope to get back on track this month starting this week. Throughout the month though while organizing our new place I often looked to Pinterest for inspiration and ideas. So here are my Pinterest projects that I was able to squeeze in here and there last month (remember it's okay to modify). 

Day 15 - Slime  (we had a blast doing this one with the Almost Superomom kids)


Materials:
-3/4 cup liquid starch
-1 cup clear glue
-Food coloring (optional)


What to do:
Mix the food coloring (1 drop is more than enough) and glue together, then add liquid starch and mix until it forms into slime. That's it! It starts out a little runny, but as you play with it more and more it becomes more stretchy and less slippery. 

Tips:A little goes a long way with food coloring, one drop is all you need to get good color.
If you use food coloring, have the kids in old t shirts and over a surface that can get stained with food coloring (great outdoor activity!) once the slime is played with, and becomes less slippery, then the food coloring stays put and won't ruin any surfaces.

Science behind it:
Glue is a liquid polymer, the microscopic molecules in the glue are in strands, like a chain. When you add the liquid starch, the strands of the glue hold together, giving it its slimy feel. The starch acts as a cross-linker that links all the polymer strands together.

Had we had more time we would have made this more scientific by experimenting with adding more or less starch or trying different glues to see if it made a difference.

The kids had so much fun and played with their slim for days...until it ended up on some clothes and wouldn't come out (so DO NOT let it get on clothes). 


Day 16 - Flash Card Organization


Materials:
-Hole puncher (my scrapbook hole puncher worked the best)
-Flash cards
-Binder rings (amazon has the best deal)
-Bin, basket, shoe box etc

What to do:
Tired of flash cards getting lost? Tired of the flash card boxes falling apart? Here is a super simple solution. Just hole punch a corner, but a binder clip through the holes and then put your flash cards into a bin, basket etc to keep them nicely stored without taking up tons of room! 

Day 17 - Puzzle Organization


Materials:
-Puzzles
-Markers, stickers, crayons
-Ziplock baggies

What to do:
Tired of puzzle pieces getting mixed up? Tired of boxes taking up room or getting destroyed? Here is a super simple way to organize your puzzles to remedy those issues. First make sure you have all the puzzle pieces. Next label the backs of the pieces with a color, shape, sticker, number, etc. I choose to do colors and shapes with markers. Next put the pieces into a ziplock baggie. I also cut out the picture of the puzzle from the box and stuck it into the baggie. I store our puzzles on our Ikea bookcase in canvas bin.

Day 18 - Truffala Trees Decoration
Our new schoolroom is Dr. Seuss themed and needed a few more decorations so I decided to use Pinterest for some inspiration and made this Truffala Tree decoration!


Materials:
-Small fur boas
-Floral stakes
-Pot
-Yellow paint
-Black marker
-Styrofoam (balls work great, I used what I had on hand)
-Moss

What to do:
First paint the floral stakes yellow. After they are dried draw black stripes around them with a permanent marker. Next take a small piece of styrofoam (you will need 3 balls total) and wrap the fur boa around the syrofoam. I used low temp hot glue. After all 3 balls are wrapped place the plant stakes into the balls and glue in place. Next place a piece of styrofoam into your container and then push the stakes into the container. Add moss, etc to the container. Now you are done and have your very own Truffala Trees.

Day 19 - Eggplant Chips
We have started eating the Primal diet so you will be seeing more recipes now on my blog. One of the first things I attempted to make was eggplant chips. They didn't turn out crispy but the family still loved them. Click link for the full recipe.


Day 20 - Salt Art


Materials:
-Salt
-Construction Paper
-Glue
-Eye droppers
-Food Coloring

What to do:
Have the kids draw designs on construction paper with glue. Next sprinkle salt onto the glue just like you would glitter. Be sure to shake off any excess. Next use eyedroppers and food coloring (mixed with a little water) to color the salt creations. It is lots of fun!!!

Day 21 - Underwater Volcano Science Lesson
This project was lots of fun and a great way to show the kids how a volcano underwater explodes. Adult supervision is required for this project.


Materials:
-Candle
-Sand
-Burner
-Water
-Glass jar

What to do:
It took us a few attempts to get this to work and we finally were successful when we just places the jar directly onto the stove burner. I was trying to be a little safer and originally tried using a pot with water.

First add a candle to the bottom of a glass jar. Next add sand on top of the candle. Then fill the jar with water. Next place the jar over a burner and keep a close eye on it. Once the wax gets hot enough you will see it start to escape from the sand (just like magma). The kids thought it was fascinating how it bubbled up through the sand and made the sand move. After several minutes the was really started coming to the surface and eventually the surface of the water was covered in wax. The kids wanted to see what would happen to the wax after the water cooled so we left our project sit out for a little bit to see what would happen. 

I made this delicious Spinach, Beef and Cheese Casserole for dinner one night and it was a huge hit. Hubby had a few recommendations though for the next time I make the dish, like more eggs, a little less spinach and more cottage cheese. Click link for the full recipe.


Another primal meal hit, cheese steak stuffed peppers. Only changes I made to this one was adding pepper jack cheese. Click link for the full recipe.


Day 24 - Finding Insect Species
My kids love insects. Any time they find an insect they want to know what type it is and learn more about it. And now that they have a yard to explore they have been bringing in all kinds of buggy visitors. Thank goodness I have a Bug Board on Pinterest where I pin various bug related resources like bug unit studies, websites, crafts, etc. It makes it so much easier to learn more about their newest buggy discovery! The link above helped us find out that the caterpillar the kids found was not a butterfly but an Orangestriped Oakworm Larva.


Our family loves soup but going Primal means no more buying canned soup from the store. I found this great recipe on Pinterest and it was another hit. We did top our soup with a little bit of cheese and sour cream as well! Click link for the full recipe.


Sunday, August 4, 2013

365 Days of Pinterest Link Up - Week 2

*This post contains affiliate links. Please see my Disclosure Page for details.


I would like to introduce you to a fun new link up and my friends blog Almost Supermom. Jordyn is a the group leader for our local homeschool group, a great wife, amazing mom to 6 beautiful children and the greatest friend anyone could ever ask for. For the last few weeks I have been helping her get her blog up and running, doesn't it look great?

Well she had a brilliant idea to put all those pins she has been adding to her Pinterest boards to good use and is committing to doing a Pinterest activity everyday with her kids over the next year. I convinced her it would make a great link up and so we are teaming up and encouraging you to do something with those thousands of pins (we know you have that many) with us over the next 365 days.

It is really simple choose a pin from one of your many boards and do it! Then blog about it and link up. Because of everything else I have to blog about (reviews, giveaways, etc) I will not be posting my activities everyday (and with my upcoming move I may get a little behind) but I will be doing a weekly pin wrap up and linking up.

Be sure to follow Almost Supermom as well as Kathys Cluttered Mind Pinterest boards to see what sort of stuff we will be doing.

So here are my Pinterest projects this week (remember it's okay to modify):

Day 8 - Boredom Buster Jar


Materials:
-Some type of jar or container (I used a plastic drink mix container)
-These 2 printables I made which you can download for FREE - boredom buster ideas and boredom buster jar label

What to do:
Print out this FREE printable with boredom buster ideas (or make your own) and this one for the jar label. There are a few blank cards included so you can come up with activities that may better suite your children. To add your owe activities either download the pdf and add text in a pdf program, use a label maker or a marker. I choose to laminate my cards to make them more durable. Cut the cards apart and place them into the jar/container. Next time your child says those dreaded words, "mom I'm bored" send them to the boredom jar!

Day 9 - Homemade Lipstick Out Of Crayons (we had a blast doing this one with the Almost Superomom kids)


Materials:
-Box of Crayola brand crayons (don't use any other type of crayons for a few reasons, 1) Crayola crayons actually go through special testing to make sure they are non-toxic and 2) other crayons don't melt nearly as well)
-Small bead containers
-Some type of oil (we used coconut oil)
-Double broiler (we used a little sauce pan and a bigger sauce pan)

What to do:
Fill a pot with water and heat it to a simmer, be careful don't let it get too hot because wax is combustible. Once the pot is simmering, place 1 crayon (without the wrapper) and 1 tsp of oil in the double boiler. Put the double boiler in the pot of water and stir the crayons and oil until completely melted and mix. Remove double boiler from heat and immediately pour the lipstick into your container. Let the mixture cool for 5-10 minutes before applying. Repeat with your favorite colors! 

This project was tons of fun and it worked really, really well. The lipstick looks great and stays on for a long time. Plus the crayon lipstick is non-toxic and doesn't contain a bunch of ingredients you cannot pronounce. You can search the internet and find lots of different recipes. I have seen several where they use shea butter, vitamin e, essential oils, glitter, glow in the dark crayons, etc.

Day 10 - TV Time Tickets


Materials:
-Small plastic tray or a basket
-Envelopes (1 for each child, 1 for placing used tickets and 1 for reward tickets)
-Letter stickers (for names)
-Colored paper
-This tag printable I made which you can download for FREE

What to do:
Print out this FREE tag printable (or make your own). I chose to use different colored paper for each child. To add your children's names download the pdf and add text in a pdf program, use a label maker, stickers or a marker. You can also add your desired amount of time to each card. We do 1/2 hr time slots on each card and each child gets 10 at the beginning of the week (for 5 hrs of TV time each week). I choose to laminate my cards to make them more durable. Cut the cards apart and place them into each child's envelope. Next label the envelopes: one with your child's name, one with used tickets and if desired one with reward tickets . At the beginning of the week give each child all their TV tickets. Throughout the week children must redeem a ticket whenever they wish to watch TV. They only get to watch TV for the amount they redeem. When the cards are gone that means there is no more TV until a new week starts. This system has been working great for us. It requires the children to budget their TV time better and also incorporates some math skills as well. You can use the reward tickets as you please. Our children get reward tickets for various things like helping out without being asked, doing something nice for someone, etc.

Day 11 - Street Signs
We recently learned about street safety and this craft was a perfect fit.


Materials:
-Construction paper
-Glue
-Scissors
-Markers
-Glitter optional

What to do:

Have your child determine which sign they would like to make. Gwyn made a yield sign and Rowyn made a street light. Next show your child a picture of the sign so they can determine what paper color then need. Next have them cut out the correct shape (s) for their sign and right the correct word if necessary on their sign.

Day 12 - DIY Shell Shower Hooks
The kids bathroom in our new place is going to be beach themed. I stumbled upon shell shower hooks on Pinterest which you can purchase on Amazon. They were cute and not overly expensive....but then I got a brilliant idea to use what we had on hand to make our own. So for FREE I made our very own shell shower hooks which not only look fabulous but also hold special memories of our beach trips.


Materials:
-Shower hooks of any kind (visit Dollar tree/clearance sections or use what you have on hand)
-Sculpey clay
-Shells
-Hammer (only if you need to break off decoration on existing shower hooks)
-Hot glue

What to do:
With a hammer break off any decoration from the existing shower hooks. Dig through your shell collection to find the perfect shells (I had the kids help me with this). Next glue the hooks onto the back of the shells. For smoother shells you may need to make clay supports. Simply mold small balls of clay and poke a hole in the middle. Bake per package directions. Then glue the hardened clay pieces onto the shells and glue the hooks into the clay. Hang up your beautiful new shell shower hooks!

Day 13 -  Best Way To Pack Clothes
We are moving again for the 7th time in 13 years. Yes I consulted Pinterest for packing and moving tips and found this great tip for packing clothes. Place folded clothes into trash bags. And for hanging clothes place all the hangers the same way and place a trash bag over the hangers by tearing a small hole through bottom of trash bag. Pull the bag down over the clothes and tie the bottom. Super cheap and super simple!


Day 14 - DIY Shell Night Light
This is another Pinterest item that gave me a brilliant idea to reuse what we had on hand. So with the help of my husband we created a beautiful piece for the kids new beach themed bathroom.


Materials:
-Night light base (3 pack on Amazon) (or visit Dollar tree/clearance sections or use what you have on hand)
-Shell
-Hot glue
-Dremel

What to do:
dismantled the kids old ducky night light and then with the help of my husband cut out the base of a shell so it would fit snugly around the night light base. I then secured the shell with hot glue. And viola a new nightlight to match the beach themed bathroom.


Sunday, July 28, 2013

365 Days of Pinterest Link Up - Week 1

*This post contains affiliate links. Please see my Disclosure Page for details.


I would like to introduce you to a fun new link up and my friends blog Almost Supermom. Jordyn is a the group leader for our local homeschool group, a great wife, amazing mom to 6 beautiful children and the greatest friend anyone could ever ask for. For the last few weeks I have been helping her get her blog up and running, doesn't it look great?

Well she had a brilliant idea to put all those pins she has been adding to her Pinterest boards to good use and is committing to doing a Pinterest activity everyday with her kids over the next year. I convinced her it would make a great link up and so we are teaming up and encouraging you to do something with those thousands of pins (we know you have that many) with us over the next 365 days.

It is really simple choose a pin from one of your many boards and do it! Then blog about it and link up. Because of everything else I have to blog about (reviews, giveaways, etc) I will not be posting my activities everyday (and with my upcoming move I may get a little behind) but I will be doing a weekly pin wrap up and linking up.

Be sure to follow Almost Supermom as well as Kathys Cluttered Mind Pinterest boards to see what sort of stuff we will be doing.

So here are my Pinterest projects this week (remember it's okay to modify):

Day 1 - Tin Can Caddy


Materials:
-6 Tin cans
-Fun embellishments-Scissors
-Glue
-Scrapbook paper
-Instead of using twin like the original pin I used a metal milk bottle carrier that I found on clearance several years ago and had laying around not being used for anything.

What to do:
Cut strips of paper to fit around the tin cans. Glue in place and embellish as desired. Follow the original instructions in the pin for using twine or purchase a milk bottle carrier. These caddies can hold anything art supplies, silverware, flowers, etc. I am planning to put ours in our new Dr. Seuss themed homeschool schoolroom to hold the kids art supplies.

Day 2 - Clipboard Wall Display 


Materials:
-Double sided sticky tape
-Scissors/X-Acto knife-Scrapbook paper
-Clipboards (Dollar Tree has the best deal but they can be hit or miss)

What to do:
Cut paper to fit the clip boards, trip as needed, the tricky part is trimming around the clamp. An X-Acto knife makes cutting around the clamp much easier. You can embellish the clip boards as desired as well. This is another item I made for our new Dr. Seuss themed homeschool schoolroom. These clipboards will hang on the wall and will be a place for the kids to display their current art projects.

Day 3 - Painted Shells - This info is also posted in my shell unit study along with another fun craft with shells.


Materials:
-Large white shells
-Paint
-Paintbrushes

What to do:
Another quick and simple project. Simply have the kids paint whatever they want on the shells. Then let them dry. My kids choose to paint sea creatures on theirs including a starfish, crab and dolphin.

Day 4 -Tornado In A Jar (we had a blast doing this one with the Almost Superomom kids)


Materials:
-Pint sized jar (small jars seemed to work better)
-Tsp of dish soap (NOT Dawn, Dial worked much better)
-Tsp of vinegar

What to do:

Fill a jar with warm water, add teaspoon of dish soap and a teaspoon of vinegar. Put the lid on very tightly and shake in a circular motion with the jar parallel to the floor for 5-10 seconds. Ta-dah! You have made a tornado in a jar...about an F1 or F2.

All the kids had fun with this experiment. We experimented with different amounts of soap, water temperature and soap types to see what produced a better tornado. The above mentioned materials were what worked best for us. 

Why it works:

Inside the jar, the fluid on the outside starts spinning before the fluid at the center. When you set the jar down, you see the fluid on the outside slowing down as the fluid on the inside continues to spin. You are seeing the formation of a vortex.  

Day 5 - Handmade Rainstick


Materials:
-Paper towel tube or other long tube
-Aluminum foil
-Small dried beans, rice, pasta, etc
-Glue
-Scissors
-Paper 
-Crayons, markers glitter, etc

What to do:
Decorate your tube as desired. Next make a circle by tracing around your tube onto a piece of  paper, make 2 of these. Draw a bigger circle around that circle and then cut several spokes between the two circles. Glue the spokes onto one end of the tub to make a cap. Cut a piece of aluminum foil about one and half times the length of your tube and about 6 inches wide. Crunch it to make a long snake like shape then twist the foil into a spring shape. Put the foil into the tube. Next pour in some rices, pasta or beans. Fill the tube only about 1/10. Have fun and experiment to see how different amounts and different types of beans, etc change the sound. Take the remaining circle and glue the spokes onto the other end of the tube to cap it. I found that tape was a lot more secure for affixing the circles to the ends.  Now have fun and make some music!

Day 6 - Schoolroom Calendar
A couple of years ago I made a great calendar board for our schoolroom very similar to the one pinned. It was a great calendar and performed its job perfectly. Velcro dots are the greatest invention ever when it comes to organizing schoolrooms. This year our calendar will have very similar items on it but it will be Dr. Seuss themed. I found this great Dr. Seuss bulletin board calendar at Michaels then used my nifty sticky Velcro dots to make changing the days each month much easier.


Materials:
-An awesome bulletin/wall calendar
-Sticky Velcro dots

What to do:
Pretty self explanatory. Put a dot with hooks onto the calendar and put the dot with loops on the day and ta-da!

Day 7 - Took the day off due to the SE Homeschool Expo. I know it's not very good to miss a day within the first week but our lives are a little crazy right now.


Tuesday, May 14, 2013

DIY Lego Storage Bin And Play Center On Wheels

*This post contains affiliate links. Please see my Disclosure Page for details.

Earlier this year Rowyn developed a love for Lego's. He is officially addicted and eats, sleeps (he does literally sleep with them) and breathes Lego's. There are days where he will spend 8 + hours playing with them. He has a wardrobe of Lego T-shirts, a collection of books and magazines and every month he now attends Lego Club at our local Lego Store. Because of his passion for Lego's I am actually in the process gathering various resources to put together a Lego curriculum for him for next school year. And thanks to my wonderful husband, Rowyn now has a terrific way to tote his Lego's around the apartment with leaving a trail behind him...and he also has a nifty little play area too.

Here is my DIY tutorial on how to make your very own Lego Storage Bin and Play Center On Wheels:


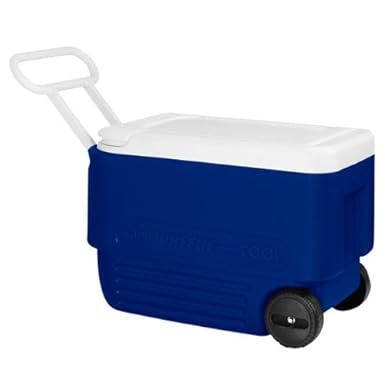
1) Purchase a 38 quart rolling cooler, like this one from Amazon or Walmart. They generally cost between $21.00-$24.00 on sale.
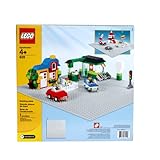
2) Purchase a large 15" x 15" Lego plate, like this one on Amazon. We choose to use grey. These generally cost around $14.00.
Product Details
3) Next make a template for the inside of the lid using a piece of cardboard.
4) Using a dremel cut the Lego plate using the template you created. My hubby did this part.
5) Sand the edges of the plate to make them nice and smooth.
6) Sand the bottom of the plate and the top of the cooler to make it rough which will allow the glue hold better.
7) Using a strong adhesive like Goop, glue the plate to the top of the cooler. Place lots of heavy books on top to make sure it fully adheres. Allow it to dry completely. You may have to use some super glue around the edges as well.


8) Fill the cooler with Legos. This was my sons favorite part!


9) Decorate the outside with fun Lego stickers. I found some really cool Lego letter stickers and Mini Fig stickers on Red Bubble.


10) Have fun and PLAY! My sons 2nd favorite part. He loves that he can create fun things and then display them on the top of his storage bin to show daddy when he gets home.


Linking up with: Top Ten Tuesday, Look What We Did
 
Designed By: Wacky Jacqui's Designs